During the setup of various UniFi/Ubiquiti Dream Machines, I occasionally run into setup issues where the device is unable to get an internet connection during the setup phase. Often these are units that have sat on the shelf for a little while and have old firmware loaded onto them. In order to get them fully operational you’ll need to go through some pretty advanced steps to load the firmware onto the units manually.
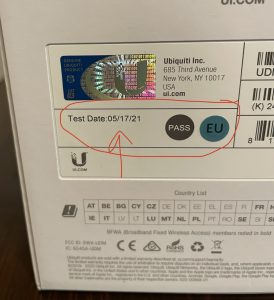
One method to tell ahead of time if you will have issues with this is if the Dream Machine has a Test Date of 5/17/2021 or earlier.
- Get a computer with an ethernet cable connection either through a USB to Ethernet adapter or a direct ethernet connection. The next steps will be written using a Mac for setup purposes – adjust steps as needed for a PC/Linux.
- Download the latest firmware update available for the Dream Machine and rename the file to simply dreammachine.bin for simplicity of Terminal commands yet to come.
Details on this step: Go to https://www.ui.com/download/unifi Or browse ui.com then click Support at the top right. Click Downloads. Scroll to bottom of the page and choose “View full file list.” Click UniFi at the top bar then look for UniFi OS – Dream Machine (currently 1.11.0 as of 2/28/2022) then click download. Accept the terms and click Download File. Look in your downloads folder and rename the recent .bin file as dreammachine.bin - Connect the Dream Machine to your internet connection with the WAN port at the bottom of the Dream Machine, then connect an ethernet cable from any of the 4 ports into your ethernet enabled computer.
- Open the Terminal application on your computer (you can search for it using Spotlight magnifying glass in the upper right or browse to the Terminal in your Applications folder Utilities.
- In the terminal window paste this command and press return:
scp ~/Downloads/dreammachine.bin [email protected]:~/dreammachine.bin - Type yes and press return when it says the RSA key fingerprint.. are you sure you want to continue. *If there is an error about the fingerprint not matching, see troubleshooting below these steps. This likely occurred because you’ve tried these steps multiple times on multiple Dream Machines and need to erase the old SSH key.
- For the root password type in: ubnt
- Wait for the transfer to complete – you’ll see a percentage going up to 100% and then you’ll return to the terminal prompt after it’s done.
- Next we’ll want to ssh into the device and apply the update. To do this use the command: ssh [email protected]
- Password as a reminder is: ubnt
Then paste or type this command: ubnt-upgrade ~/dreammachine.bin - Wait for a few minutes as the Dream Machine upgrades itself – after the startup chime you can go back to your iPhone or Android phone and set up the Dream Machine as you would normally do.
* If the RSA key fingerprint “doesn’t match” during step 6, you’ll want to go into your user folder on the computer, show invisible files if you don’t have them visible yet (shortcut command is Command, Shift, period). Look for a folder named .ssh and open it. Delete the known_hosts file, then try step 6 again.
