Apple One subscription woes and fix

Apple One subscription logo

Apple One offers a subscription service to get many of the offerings Apple provides like Apple Music, Apple TV+, Apple Arcade, iCloud storage, Apple News+, and the new Apple Fitness+. One of the key features of the Family and Premier plans is you can share the subscription with your family share members.

Where things had trouble for one of my clients was in the attempt to share the subscription to the rest of the family share members — the options that should have been there were not. One of the quirks was a family member had been sharing Apple News+ with the main owner of the Family Share. Without being able to share the Apple One plan with the rest of the family, each member had to subscribe to the services separately!

Working with Apple Support and trying various steps didn’t resolve the issue. Cancelling Apple News+ under the other family member also didn’t resolve the issue as the subscription would expire 2 weeks from today (the subscriptions renew every month).

Finally the thing that solved the issue was to stop Family Sharing altogether and start it fresh. We went to the owner’s Family Sharing pane on System Preferences–> Family Sharing. Then stopped Family Sharing. Then started family sharing again – it immediately offered to share all of the subscriptions offered by Apple One and we then invited each of the members individually.

After inviting everyone we went back into the sharing options and enabled iCloud Storage, and Purchase Sharing.

Problem solved! Unfortunately the solution wasn’t as elegant as I would have hoped, at least it works.

By |2020-12-31T14:33:36-08:00December 31, 2020|Tech Tips|0 Comments

M1 – A new computer that felt dramatically faster than the last

M1 Mac Mini connected to an LG 5K display
New 2020 M1 Mac Mini connected to a LG 5K display.
Magic Keyboard, and Magic Mouse 2 sitting below.

Several times in my experience I’ve felt dramatic improvements with computers I’ve purchased.

  • The first time I got a 3D graphics card (VooDoo Banshee) on a 1990s Windows computer.
  • The first time I installed a SSD (Solid State Drive) into a computer and experienced the before/after effects.
  • The most recent time I built a PC from scratch with some of the top end components.
  • Now with the new M1 processor on the Mac Mini.

After a few days with the new Mac Mini I’m thrilled to report that at $699 it’s a killer deal, very fast, and very quiet.

All the new M1 systems that Apple recently released have been getting rave reviews for their speed, battery life, and near silence. I can attest to that for the new Mac Mini.

Comparing the system to a new-ish MacBook Air from 2020 was eye-opening. Running Big Sur (Mac OS 11) the MacBook Air had a hard time keeping various apps open without blazing its’ fan. Driving a large 5k display as shown in the photo seemed to tax the system a fair amount when running Zoom or FaceTime. Good luck using resource-intense websites like Facebook or Nextdoor without the system slowing down.

Gone are the days of fans buzzing, slow app response, laggy video playback in Zoom, and being forced to quit things when they’re not in use.

Some of my pain came from Mac OS Catalina and Big Sur as both upgrades slowed the system down. Every few revisions of the new system software will slow devices down, and then one will come out that will speed things back up again — Catalina and Big Sur are the ones that slow things down a bit and add new features.

One very unique feature of the new M1 computers is that they allow you to run various iPhone and iPad applications! So for those of you who have a favorite game or application on your iPad that is not available on the Mac App Store — with the newest systems that’s no longer a problem.

One minor limitation is the new M1 computers will not allow Parallels/VMWare or Windows to run. Microsoft may choose to license and sell a ARM based version of Windows in the next few years and once that is offered we will have a official method of using Windows on the Mac.

One minor bug on the new Mac Mini that I’m using that may be resolved in the future is the bluetooth cuts out on rare occasion. My suggestion is if you plan to get the Mac Mini you may want to use a Wired keyboard and Mouse, or a Logitech mouse that works off of a USB wireless dongle until Apple resolves the bluetooth quirk.

Expect new iMacs, Mac Pros, and MacBook Pros in early 2021 or some time next year. For now if you are on the budget end of the spectrum, now is a fantastic time to upgrade.

Overall – color me impressed! $699 for a system that blew me away with its’ great performance and ultra quiet nature.

By |2020-12-09T18:24:06-08:00December 9, 2020|Tech Tips|0 Comments

How to shrink a PDF file on a Mac without needing to purchase Adobe Acrobat Professional

When you have a PDF file that is quite large and you want to try and make it smaller there are several options.

  1. Go back to the original file, such as Microsoft Word/PowerPoint, and try to use the tools inside that application to shrink the document and then save it out as a PDF file. For example on newer versions of Word, you can click the File menu and choose “Reduce File Size”. From the popup window you can change the Picture Quality to suite your needs – On-Screen being a generally decent option, otherwise Print also works. After you’ve shrunk the original file you can save as a PDF file again. This version may be smaller than it used to be due to the smaller photo sizes. For details on how to do this, check out my guide on Shrinking Word and PowerPoint documents here: https://wizdomonwheels.com/shrink-word-or-powerpoint-file/
  2. Use another tool to try and shrink the PDF document further.

I tested many different PDF readers and compressors in order to determine the one that seemed to work the best (smallest size with not too much quality lost). These included Adobe Acrobat Professional 9, PDF Expert, PDFpenPro, the built in Mac options, and finally an application called PDFCompress. Acrobat Professional was able to shrink the sample PDF file further than all the rest of the applications, however a close second was using a free application called PDFCompress by MetaObject.

Here are the steps you would use to get PDFCompress to work for you:

  1. Visit the PDFCompress download link by clicking here: http://www.metaobject.com/downloads/Products/PdfCompress/PdfCompress-6.3.3.dmg
  • 2. Open the downloaded DMG file and drag the PDFCompress application into your Applications folder so you can find it again in the future.
  • 3. Open the Applications folder and launch PDFCompress by double clicking the icon and clicking OK on the various prompts that may come up.
  • 4. Now it’s time to set the preferences for the software in order to find a balance between too big a file with excellent quality and too small a file with bad quality. Click the PDFCompress menu in the upper left of your screen and choose “Compression Options” from the menu.
  • 5. Next drag the Size/Quality slider bar around 1/3 of the way from the left side. You can also put the slider bar in the center, which will make slightly bigger files. Check the box to “Downsample for Web and Screen”.
  • 6. Close the Compression Options dialog box.
  • 7. Take the PDF file you want to compress and drag it onto the PDFCompress icon on your dock or in the Applications folder.
  • 8. If it was successful a new PDF file will appear nearby your old one with the file name ending in: _web.pdf

If a dialog box appears saying it cannot shrink the file further, then you’ve reached the maximum you can compress the file without going back to the original file and working from there, or using the expensive Adobe Acrobat Professional software.

Some files can be compressed quite well, and others cannot. For example one PDF file began as 84.6MB and through the steps above was able to compress down to 5.4MB! The results look similar when comparing the two side by side.

Original 84.6MB PDF on left, and Compressed 5.4MB PDF on Right
By |2022-03-09T12:53:05-08:00November 18, 2020|Tech Tips|0 Comments

What to do if you get a blank sign in page when trying to use Word, Excel, PowerPoint

I recently ran across an issue where I had downloaded Microsoft Office 2019 fresh from the internet, installed the software, then attempted to open Microsoft Word. Upon opening it asked me to activate/sign in. I signed in with the client’s email and password successfully however the next page was supposed to show what licenses were available but instead simply showed a blank page similar to the image below.

I attempted many things to try and resolve the issue, however the simple fix was to Right Click inside the window, or hold the Control key down on the keyboard and click inside the window with your mouse cursor. Once clicking it offered a “Reload Page” option. If the page activates properly from there, you’re all set! Otherwise select the “Reload Page” option and it will refresh the blank page and should activate.

By |2020-11-18T14:02:49-08:00November 18, 2020|Tech Tips|0 Comments

Making your laptop more like a desktop – by connecting it to a display

Many of my clients love their iMacs and other desktop computers, but they also want to take their system on the go.

One option is to get two devices — a iMac that stays at home and a iPad or laptop that goes with you.

Another option is to get a laptop and connect it to a large screen.

The beauty of this solution is you have your files everywhere and only need to maintain one computer or device.

PROS:

  • One device to keep up, and all your files in one place
  • The default configuration MacBook Pro is typically faster than the default configuration of the iMac (due to Flash Storage/SSD)
  • Two screens if you need them – put your email on the other screen as you use your web browser

CONS:

  • Accessories and cables need to be purchased, and clutter with cables is a bit more noticeable as many cables are hidden behind a iMac.
  • Higher initial cost as you’ll need to purchase the screen, the display adapter/cable, and potentially a keyboard/mouse if you don’t already have one. Long term lower cost as you only need to maintain one system and only need to purchase one device.

Techie notes to make this happen — here is what you’ll need:

  • A display or monitor — pick your size and the quality you want to get. Most displays are decent quality with nice colors and brightness. If you’re doing a lot with photographs you might consider spending a bit more on the display.
  • A cable to connect the display to your computer — First find out what connectors you have on your computer. If it’s a recent Mac from around 2018 and newer you should have the USB-C connector. If your computer is older you may need other types of adapters. Look on the side of your computer for a HDMI connection. If you don’t know, reach out and I can advise what type of connector you might have and adapter you might need.

    Here are the various connectors you might have on your computer:

    • HDMI – this connector is the same one that many Televisions have, and your laptop may have one on the right side.
    • USB-C – this connector is a newer connection that appears on both PCs and Macs from around 2018 and newer. See the photo below for reference to both connectors. HDMI connector and USB-C connector

For older systems without a HDMI or USB-C connector you might need alternative cables and adapters such as a Mini-displayport to HDMI adapter.

The last consideration is to get a Mouse and Keyboard — by doing this it makes the laptop more like a desktop. You can leave the keyboard and mouse by the screen and when you plug your computer in, you’re ready to go.

The two main options I recommend for Mice and Keyboards are:

  • Apple Magic Keyboard and Apple Magic Mouse 2
  • Various Logitech Wireless Keyboards and Mice

My home setup – LG display, Apple Keyboard and Mouse, a metal stand, a wireless phone charger, a Apple Superdrive DVD/CD drive, and a Backup hard drive

Another example of a MacBook Air connected to a LG display, with a wireless Magic Keyboard and Magic Mouse 2

By |2023-06-15T13:35:18-07:00April 1, 2020|Recommended Equipment, Tech Tips|0 Comments

Comcast offering free internet for 2 months for Low-Income Families

Low Income Internet Service $9.95/month

For anyone who knows or is a low-income family, I would recommend checking out the Comcast website I’ll include the link below for. Comcast is offering 2 months free service for the Covid-19 outbreak. The speed isn’t too bad at 25Mbps and free in-home WiFi.

https://www.internetessentials.com/?rid=4502991275&mid=20200331_Adhoc_CM_Crisis_DWWeekly_Email3

By |2020-03-31T17:55:04-07:00March 31, 2020|Tech Tips|0 Comments

Data Recover – Drive Savers virtual tour

Drive Savers is my favorite partner for recovering info from all sorts of devices. They’re the only company I trust to send devices out to. Check out the video below for a look into their clean room and meet some of their reps.

If you do need recovery, use our Referral code for a bit of $ off. 
Call 800-440-1904 any day or time.
Use the Referral Code: DS20079

By |2020-01-07T20:25:47-08:00January 7, 2020|Tech Tips|0 Comments

iPhone Data recovery from Drive Savers

Drive Savers is our favorite partner for recovering info from all sorts of devices including iPhones/iPads. They’re the only company I trust to send devices out to. Check out the video below for a look into their clean room and meet some of their reps.

If you do need recovery, use our Referral code for a bit of $ off.
Call 800-440-1904 any day or time.
Use the Referral Code: DS20079

By |2020-01-07T20:14:54-08:00January 7, 2020|Tech Tips|0 Comments

Setting up MalwareBytes on the Mac

These steps will cover the download, install, and registration of MalwareBytes on the Mac. Some steps are optional depending on the version of the system software you’re currently running.
Step 1) Open Safari and go to www.malwarebytes.com

Safari browser tab with MalwareBytes.com in address field

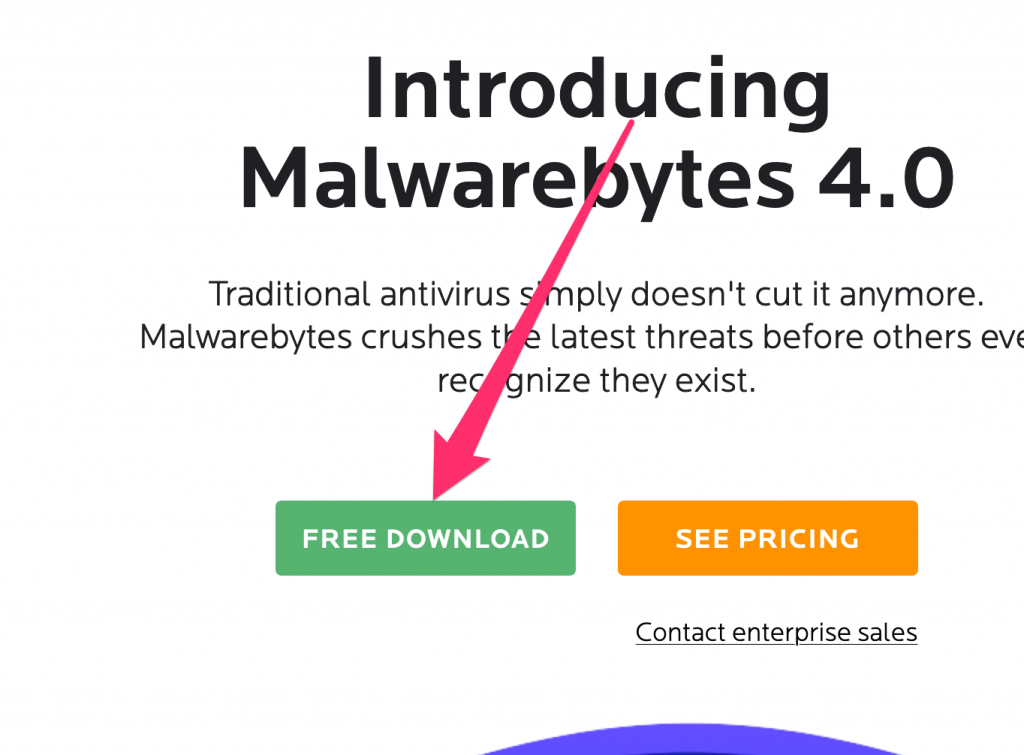
Step 2) Click the Free Download link on the page

Introducing Malwarebytes 4.0 page with Free Download link and See Pricing link. Press Free Download.

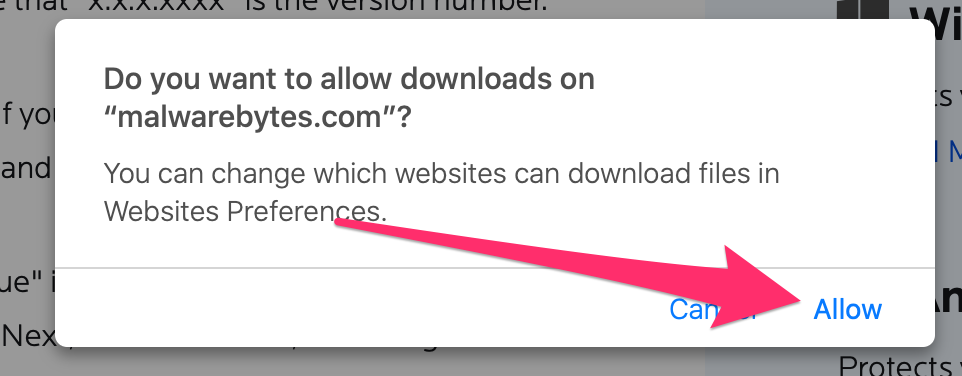
Step 3) Click the Allow on the dialog box (Skip this step on older systems or ones this dialog does not show up on)

Do you want to allow downloads on Malwarebytes.com dialog, choose Allow.

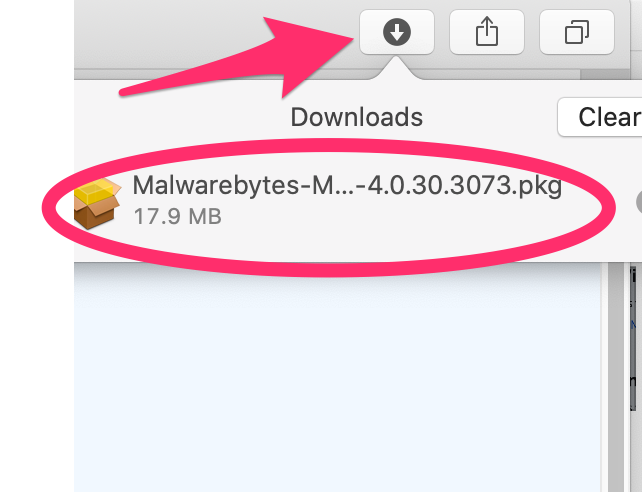
Step 4) Look in the upper right and click the Download icon, then double click to open the Malwarebytes pkg file.

Downward pointing arrow - the downloads icon in the upper right of the Safari window - click the icon and double-click MalwareBytes.pkg installer package.

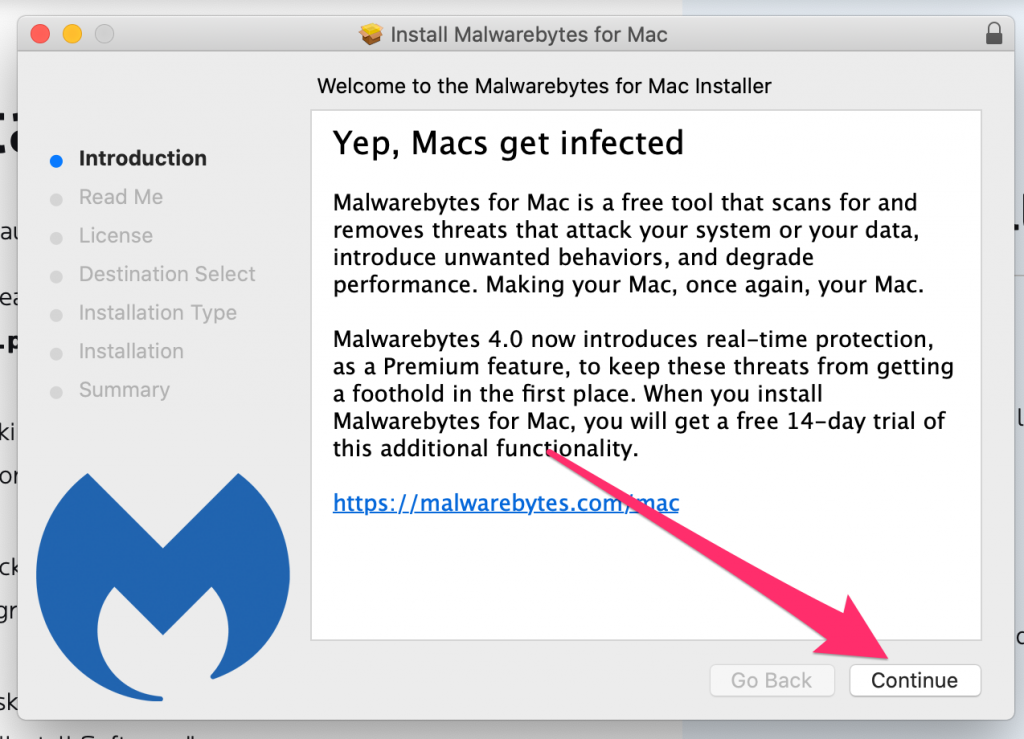
Step 5) Click continue several times on the install window that appears.

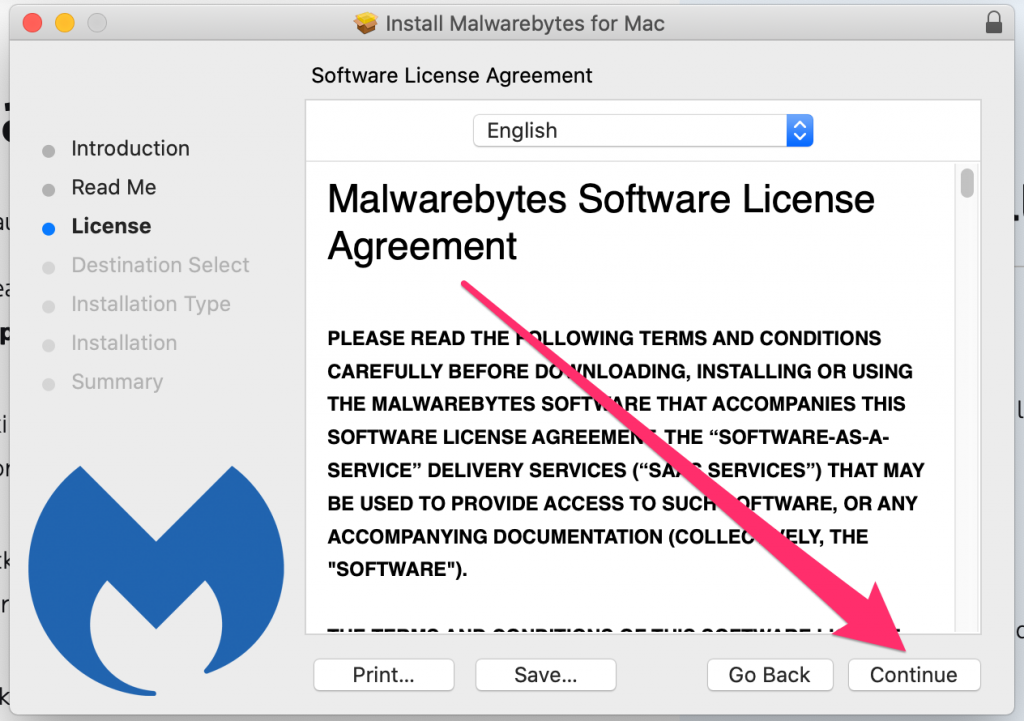
Welcome to MalwareBytes for Mac installer window, click continue.

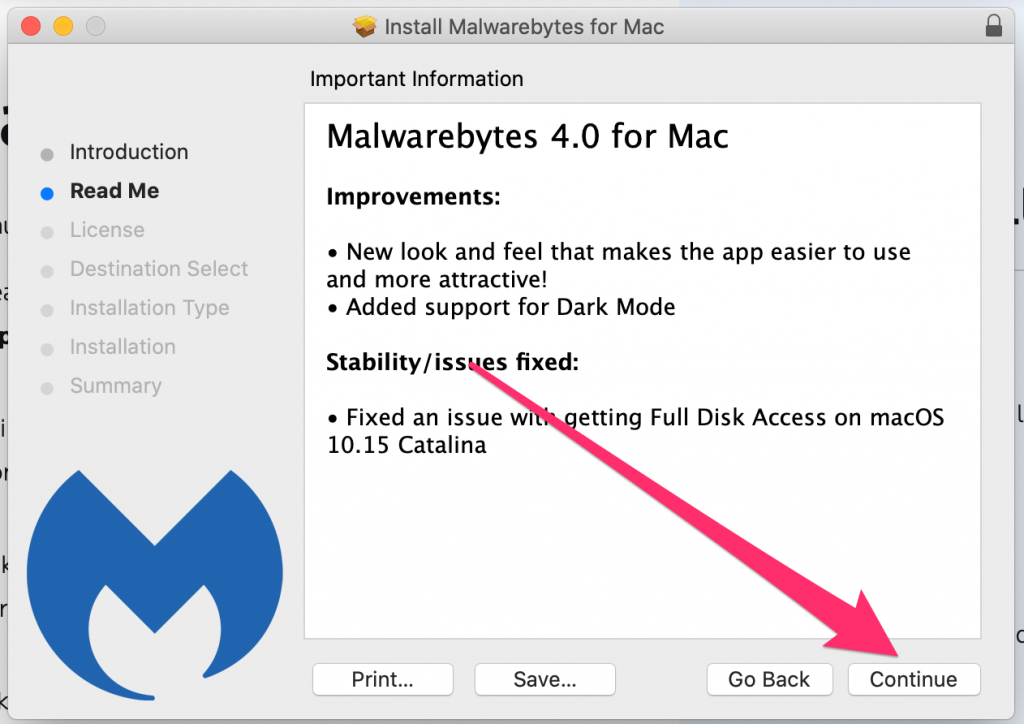
Important information window from installer, click Continue.

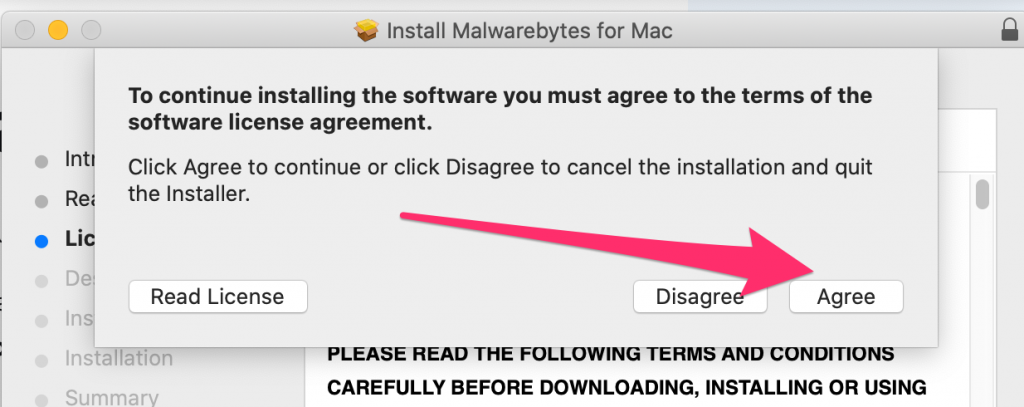
Step 6) Click Agree

To continue installing the software, terms of software license agreement, click Agree.

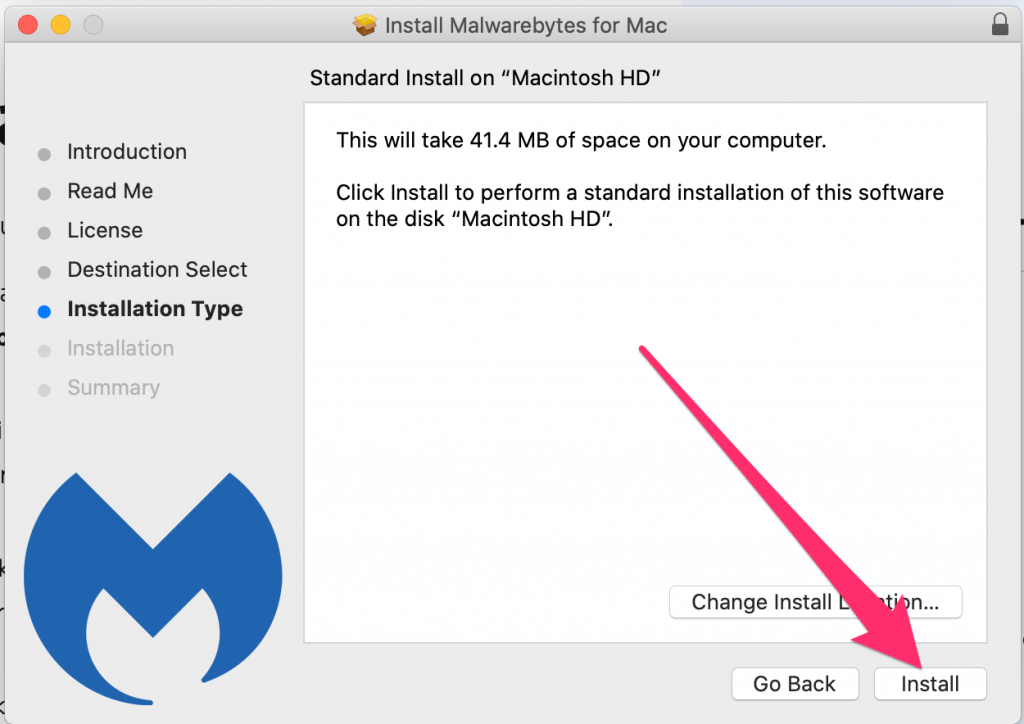
Step 7) Click Continue

Standard install on Macintosh HD window, click Install.

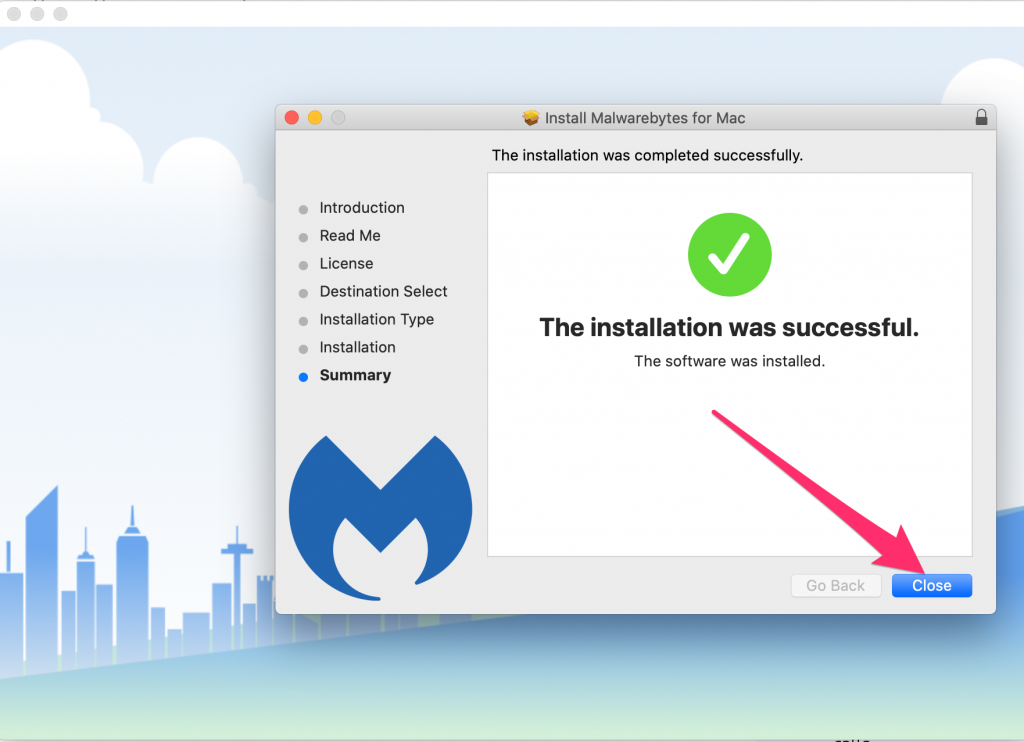
Step 8 ) Click Close  

Installer window, done installing, click Close.

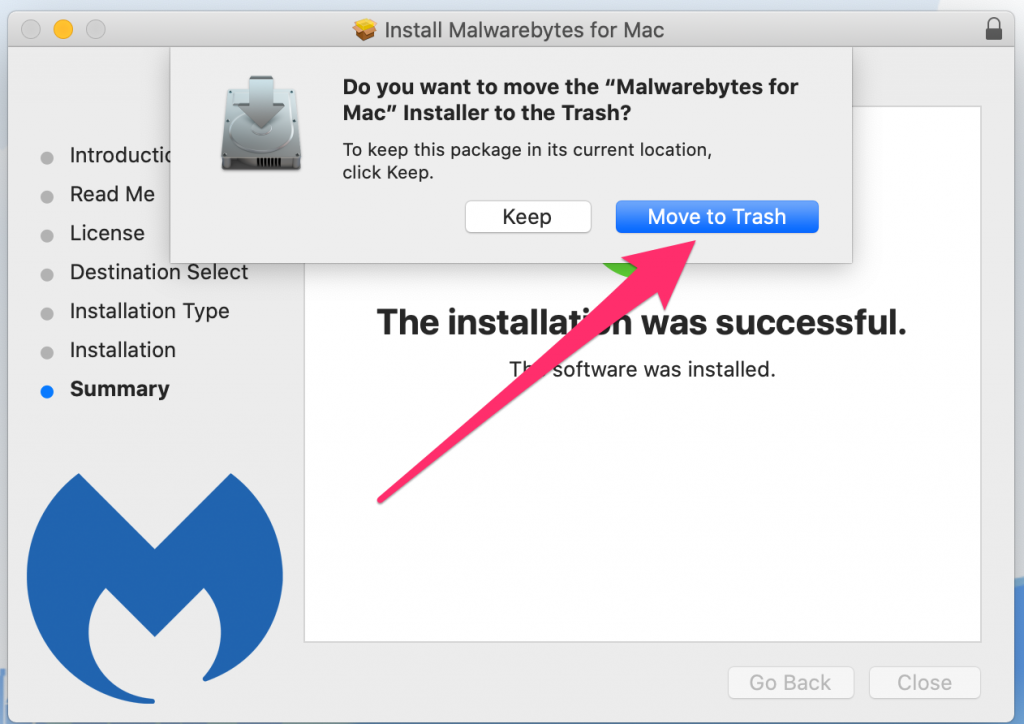
Step 9) Click Move to Trash

Do you want to move MalwareBytes installer to trash? Click Move to Trash.

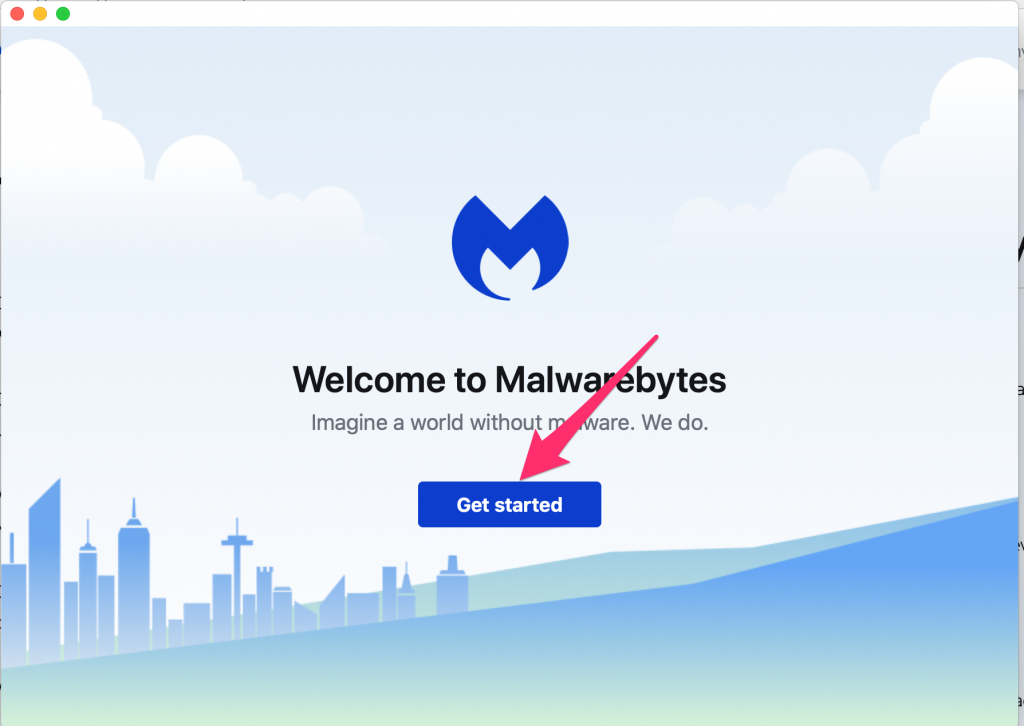
Step 10) Click Get Started

Welcome to Malwarebytes screen - click Get Started.

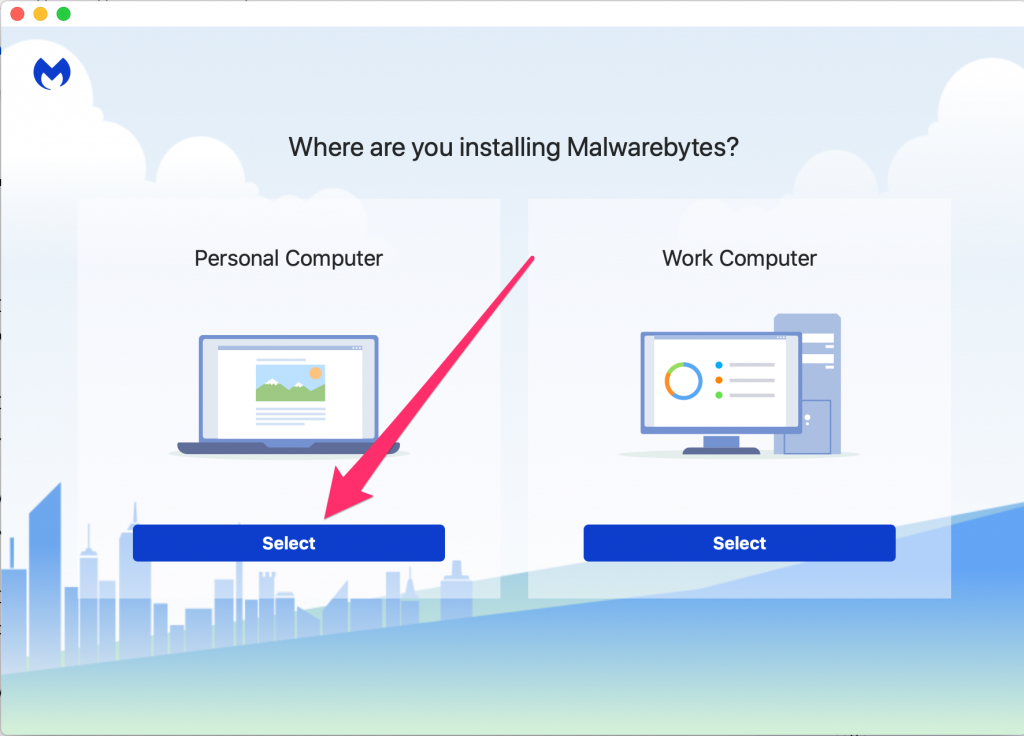
Step 11) Click for Personal Computer

Where are you installing Malwarebytes - click Select under the Personal Computer section.

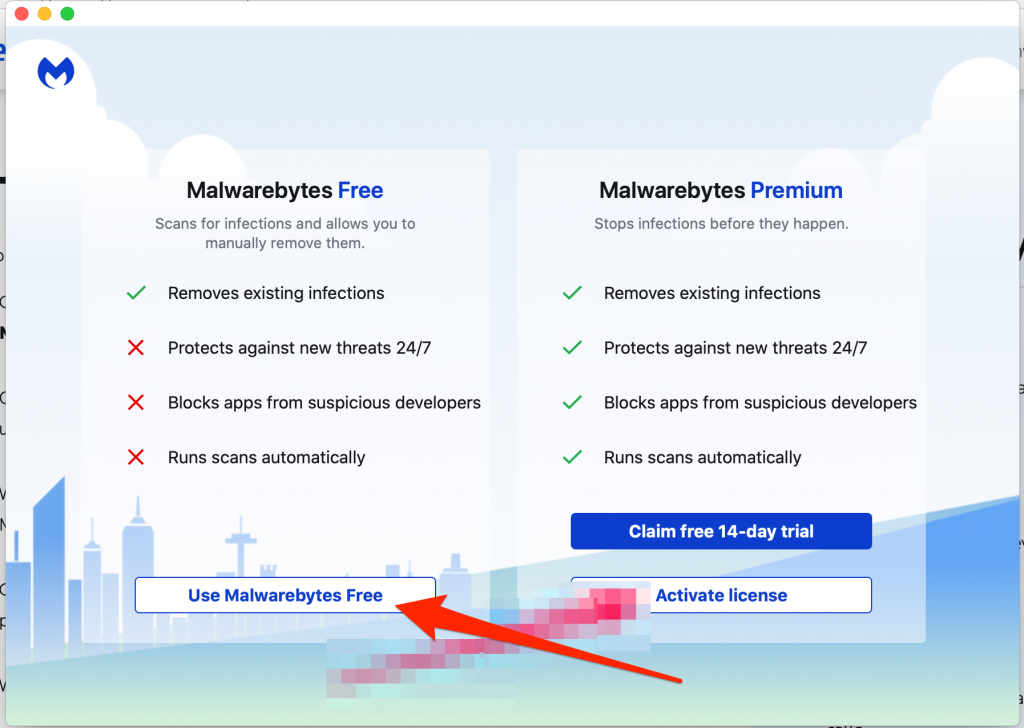
Step 12) Click Use Malwarebytes Free

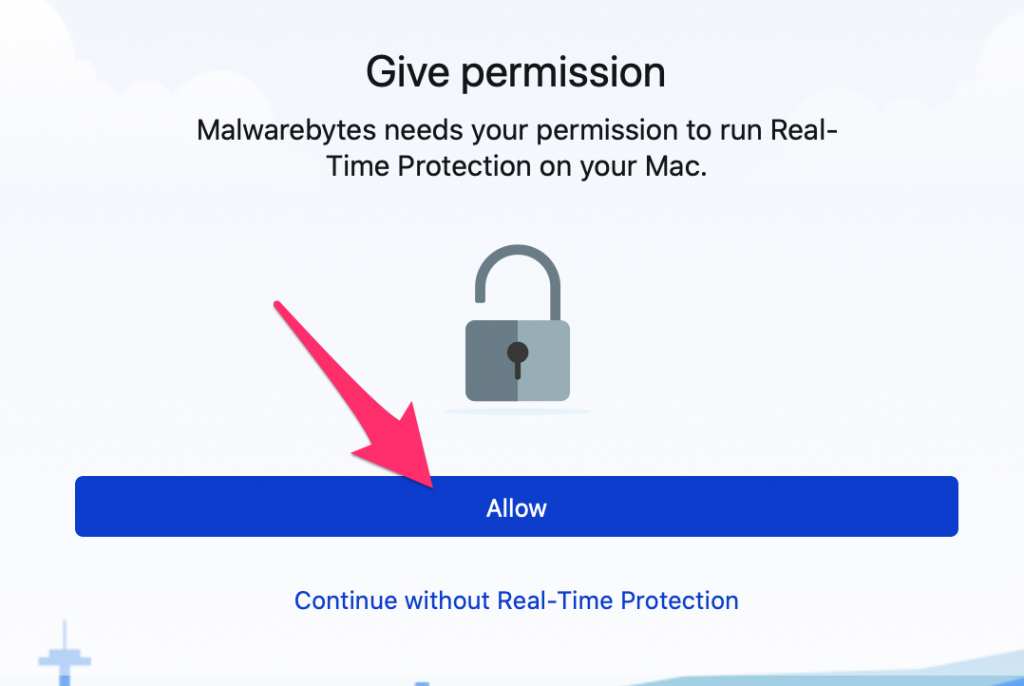
Step 13) Click Allow to give permission

Give Permission window, click Allow.

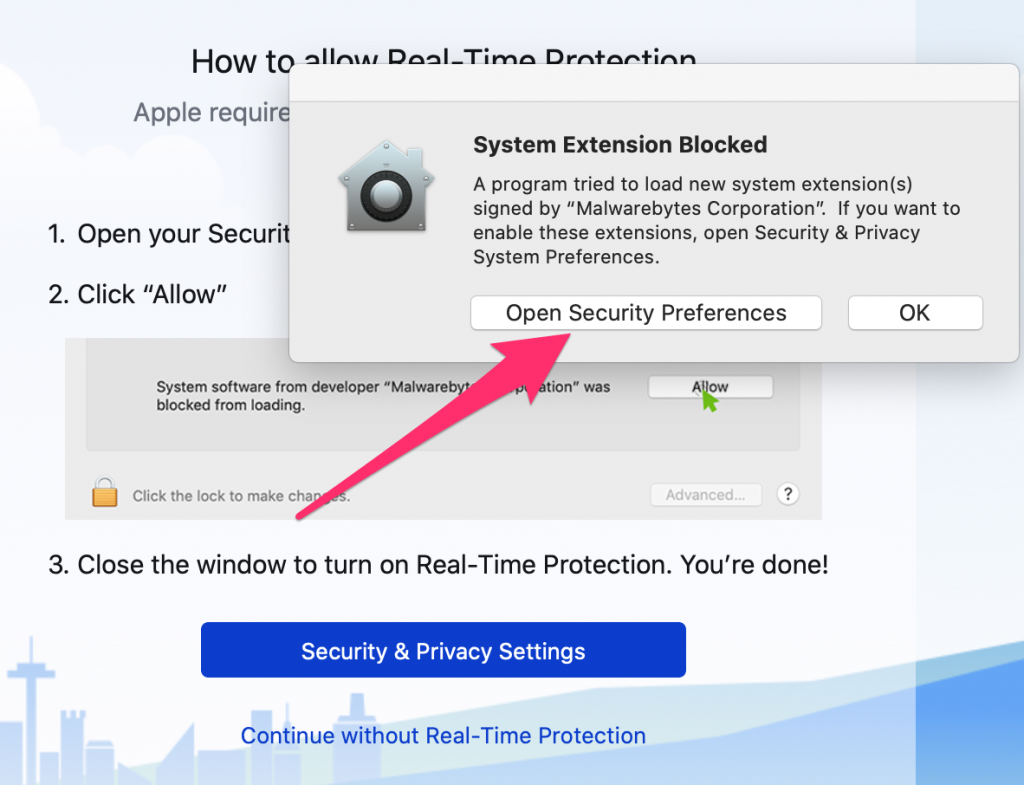
Step 14) Click Open Security Preferences on the dialog box that appears

System Extension Blocked window, click Open Security Preferences.

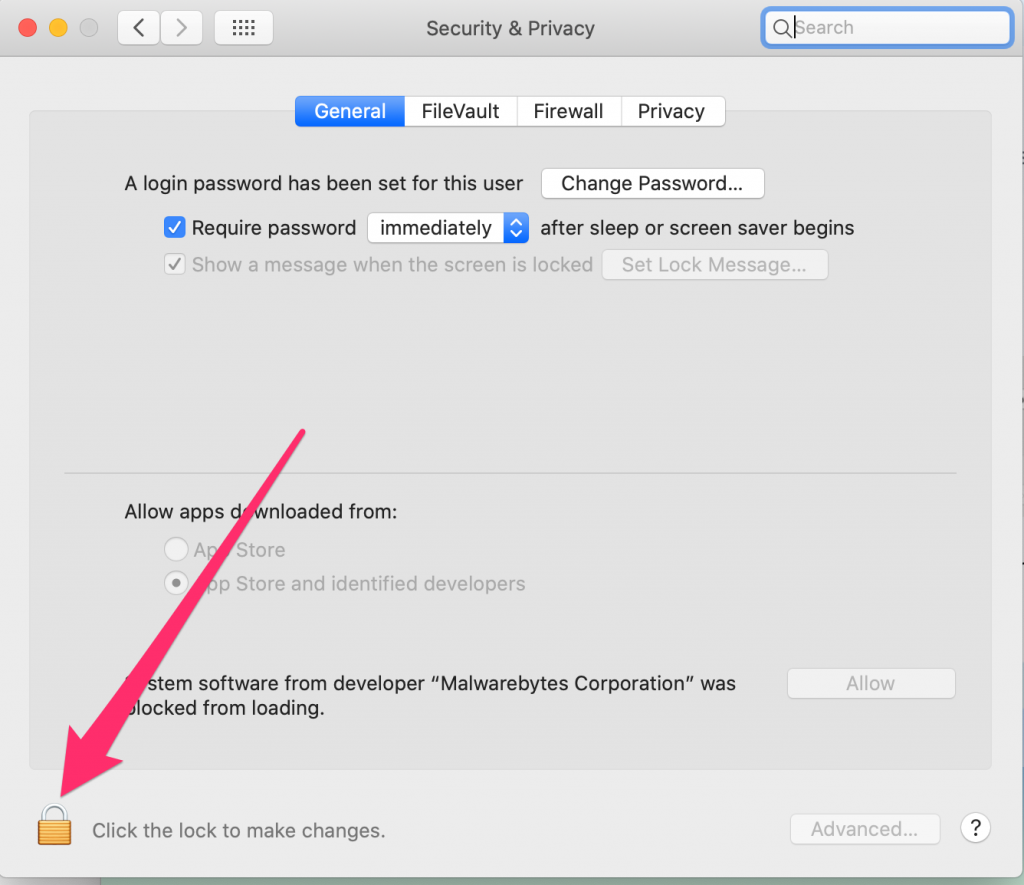
Step 15) Click the lock in the bottom left on the Security & Privacy System Preference window that came up

System Preferences window with Security & Privacy open. Click lock in lower left of window.

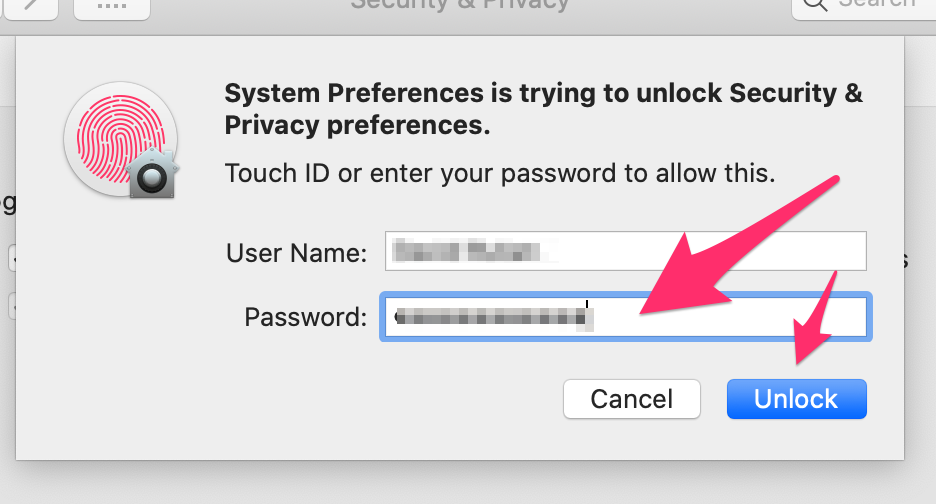
Step 16) Enter your computer’s username and password. If the username appears blank, try entering PSI Admin or your own name with Admin at the end

Enter your computer's password on the Username and Password dialog box.

Step 17) Click Allow on the right side of the window

Bottom right side of the Security & Privacy system preference window, click the

Step 18) Click the Privacy tab near the top of the window

At the top of the Security & Privacy window, click the Privacy tab.

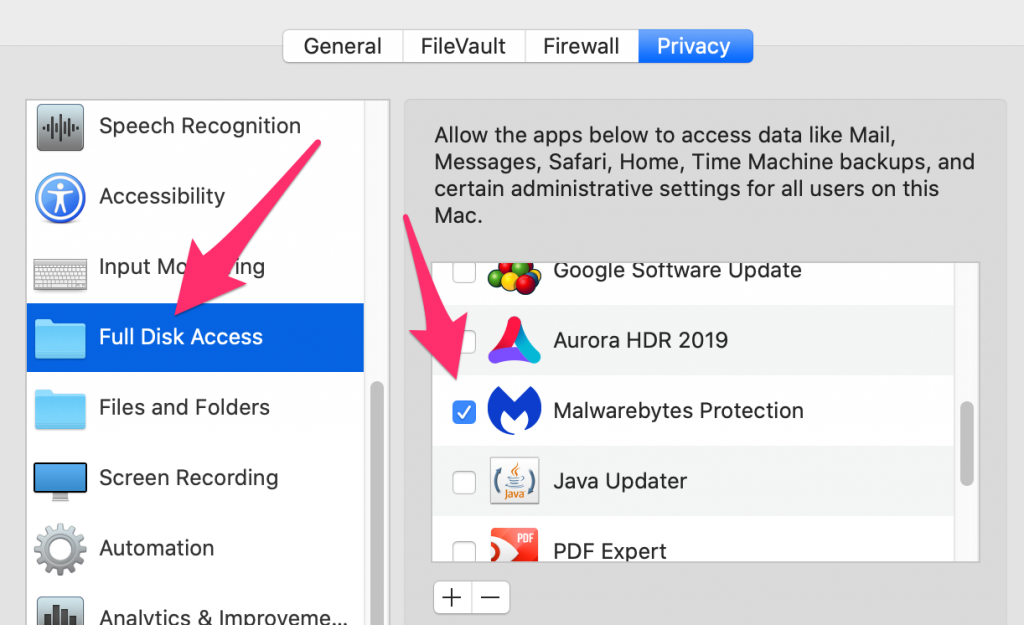
Step 19) Scroll down the page a bit and look for Full Disk Access — click on it when you find it. On the right side look for “Malwarebytes Protection” and check the box to the left of it.

Privacy window, click the

Step 20) Optionally, look in the upper right of your screen and click “Don’t Allow” on the Malwarebytes Agent Notifications window.

In the upper right of the screen will appear a notification that asks Don't Allow or Allow MalwareBytes agent notifications. Click Don't Allow.

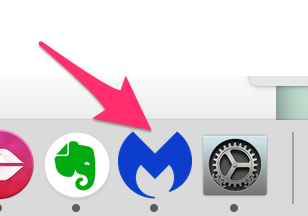
Step 21) Look on your dock for the blue MalwareBytes icon and click it to open the software

Blue MalwareBytes icon on the dock - click on it.

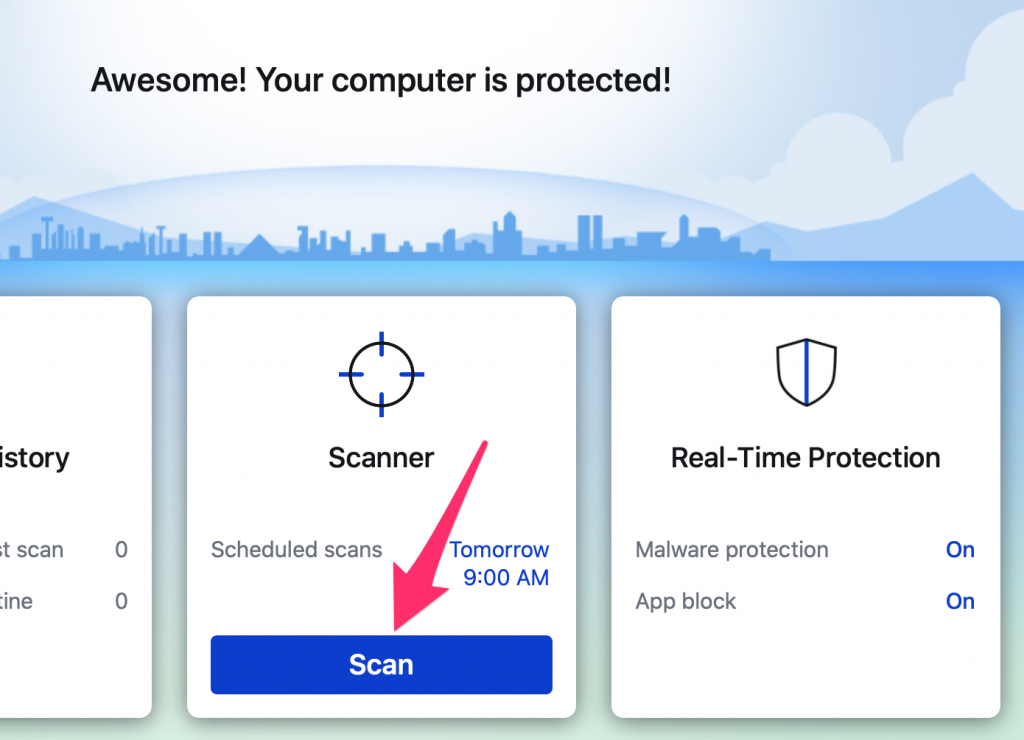
Step 22) Click “Scan” at the bottom of the window and see if anything bad is found — If anything is found, choose to clean it up and let David Rutan or Ralf [email protected] know. Consider taking a photograph with your phone or a screenshot with the computer and sending a picture of what MalwareBytes found to David Rutan or Ralf.

Malwarebytes window, click the
By |2023-06-15T13:36:48-07:00December 13, 2019|Power Speaking, Tech Walkthrough Guides|0 Comments
Go to Top